SmartSTREAM Startup Guide
Return to the User Support Site TopVideo On-Demand Streaming
By using Video On-Demand Streaming, users can upload videos created in advance to SmartSTREAM, allowing viewers to watch videos at their preferred time on their device of choice.
This section explains the procedures for uploading videos, encoding them into formats suitable for viewing, and creating a player for playback.
Create a Profile
Create a profile by selecting Home > Profile > Create Profile.
Configure video quality and format settings when converting common video files (.mp4, .mov, etc.) into file formats suitable for internet streaming.

Profile Item Descriptions and Input Examples
| Item | Description | Recommended Default Settings |
|---|---|---|
| Title / Description | Since this will not be made public, please feel free to set a title and description that are easy to understand. | Optional |
| Profile Type | Select whether this profile will be used for Live Streaming or Video On-Demand Streaming. | |
| Default Setting | Check this box if this is a frequently used profile. | Blank |
| Streaming Settings | Select this if you want to use streaming settings configured under options such as "Apply Viewing Restrictions." | |
| Publication Setting | You can set the profile to Draft, Private, or Public. | Public |
| Video Bitrate (bps) | Specify the video quality. The unit is bps. Higher values allow for higher-quality video, but if the viewer’s network connection is slow—such as on a mobile network—smooth playback may not be possible. | For smartphones (mobile networks): 1000000–2000000 / For PCs (fixed networks): 2000000–4000000 |
| Width (px) | Specify the width of the streamed video in pixels. | Low quality: Width 640 Height 380 / High quality: Width 1280 Height 720 |
| Height (px) | Specify the height of the streamed video in pixels. | |
| Video Frame Rate (fps) | Specify the frame rate of the streamed video in fps. Higher values make the video appear smoother but increase the file size. | Match Source |
| Video Keyframe Interval (frames) | Specify the interval of I-frames. Higher values improve seeking speed with an increase in file size. | 30 |
| Video Bitrate Mode | CBR: Fixed bitrate. Data is transmitted at a constant bitrate at all times. VBR: Variable bitrate. The amount of data transmitted and received is not fixed; the bitrate is used as needed to match the video content. |
VBR |
| Audio Bitrate (bps) | Specify the audio bitrate. | 96000 |
| Audio Sampling Rate (Hz) | Specify the audio sampling rate. The sampling rate is the number of samples per second. Higher values result in better audio quality but increase the file size. |
48000 |
| Package Type | Select the video format for streaming from either HLS or MPEG-DASH. | HLS |
| Priority | Specify the order in which packaging is performed using an integer. Leave this field blank if you are not setting multiple packages. |
Blank |
| Label | You can assign labels to package settings for management. | Blank |
| DRM Type | You can select the type of DRM encryption. The available DRM types vary depending on the selected package type. |
None |
Create a Web Player
In order for viewers to watch videos, a Web Player is required, users create a Web Player here
-

Click Create Web Player from Home > Web Player tab.
-
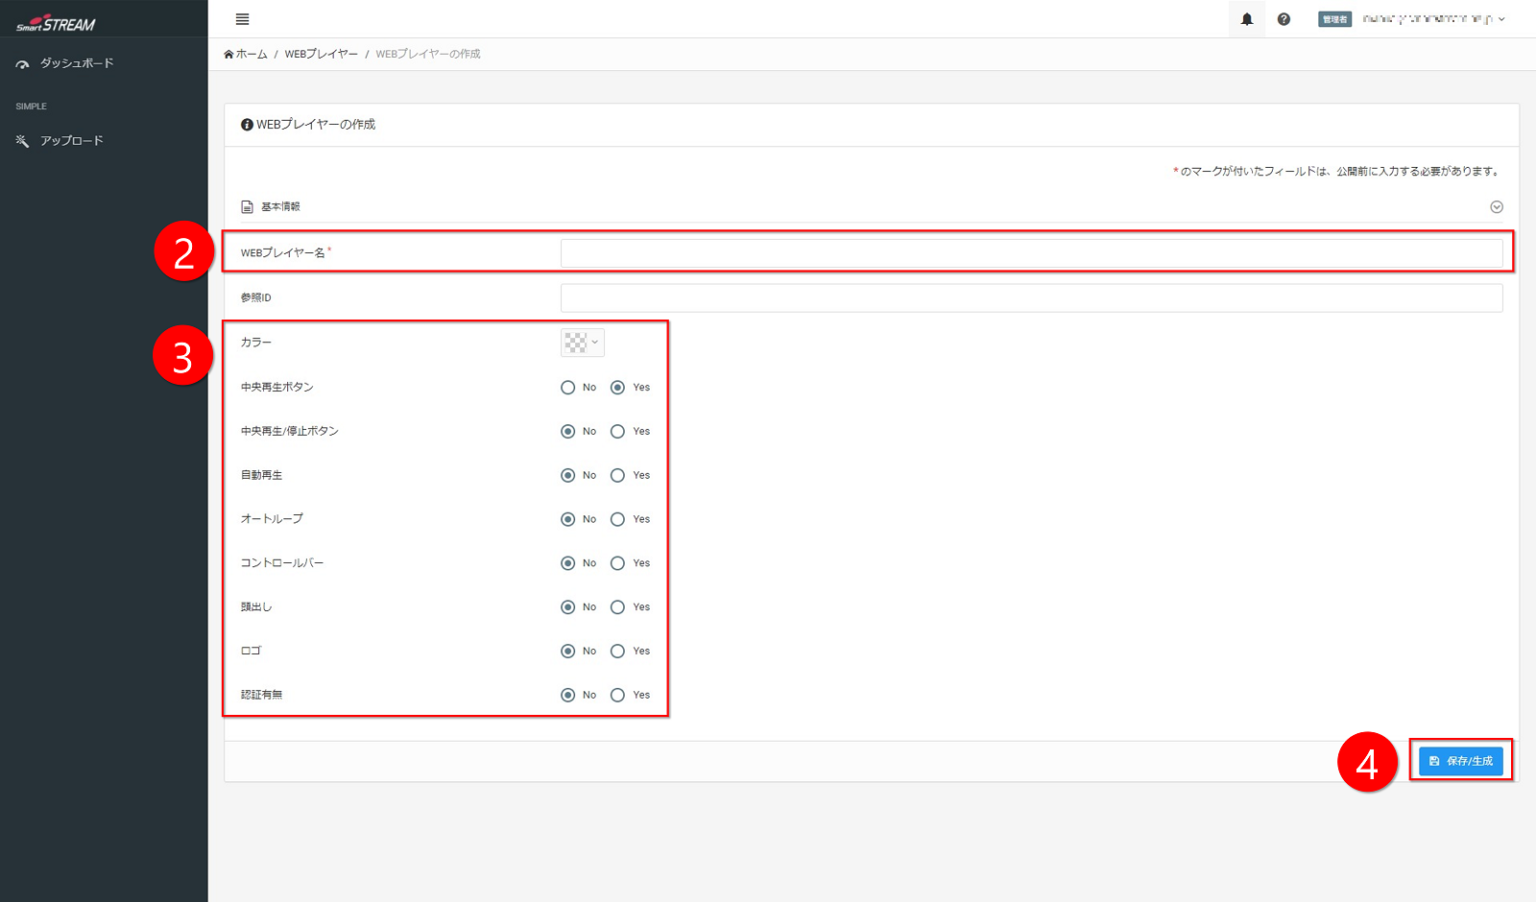
Set the Web Player name.
-
Configure colors, controls, and other settings according to your preferences.
-
Click Save / Generate.
- Even if "Autoplay" is set to Yes, it may not function correctly depending on browser specifications.
In that case, please press the play button to start playback manually. - It is recommended to set both "Center Play Button" and "Center Play / Pause Button" to Yes.
Recommended VOD Settings
| Item | Recommended Basic Settings (On-Demand) |
|---|---|
| Web Player Name | Since this is not made public externally, please set a clear and easy-to-understand name. |
| Reference ID | Blank |
| Color | User-defined |
| Center Play Button | Yes |
| Center Play / Pause Button | Yes |
| Autoplay | No |
| Auto Loop | No |
| Control Bar | Yes |
| Seek | Yes |
| Playback Speed Change | Yes to allow playback speed changes |
| Loop | Yes |
| Logo | No (Yes if a logo is configured) |
| Authentication | No (Yes if password authentication is configured) |
* If customization is applied, proceed to Customize Player
Upload and Encode Video
There are character strings that cannot be used as file names, such as half-width spaces and half-width parentheses ().
For details, please refer to Characters That Cannot Be Used in Video File Names in the Notes.
-
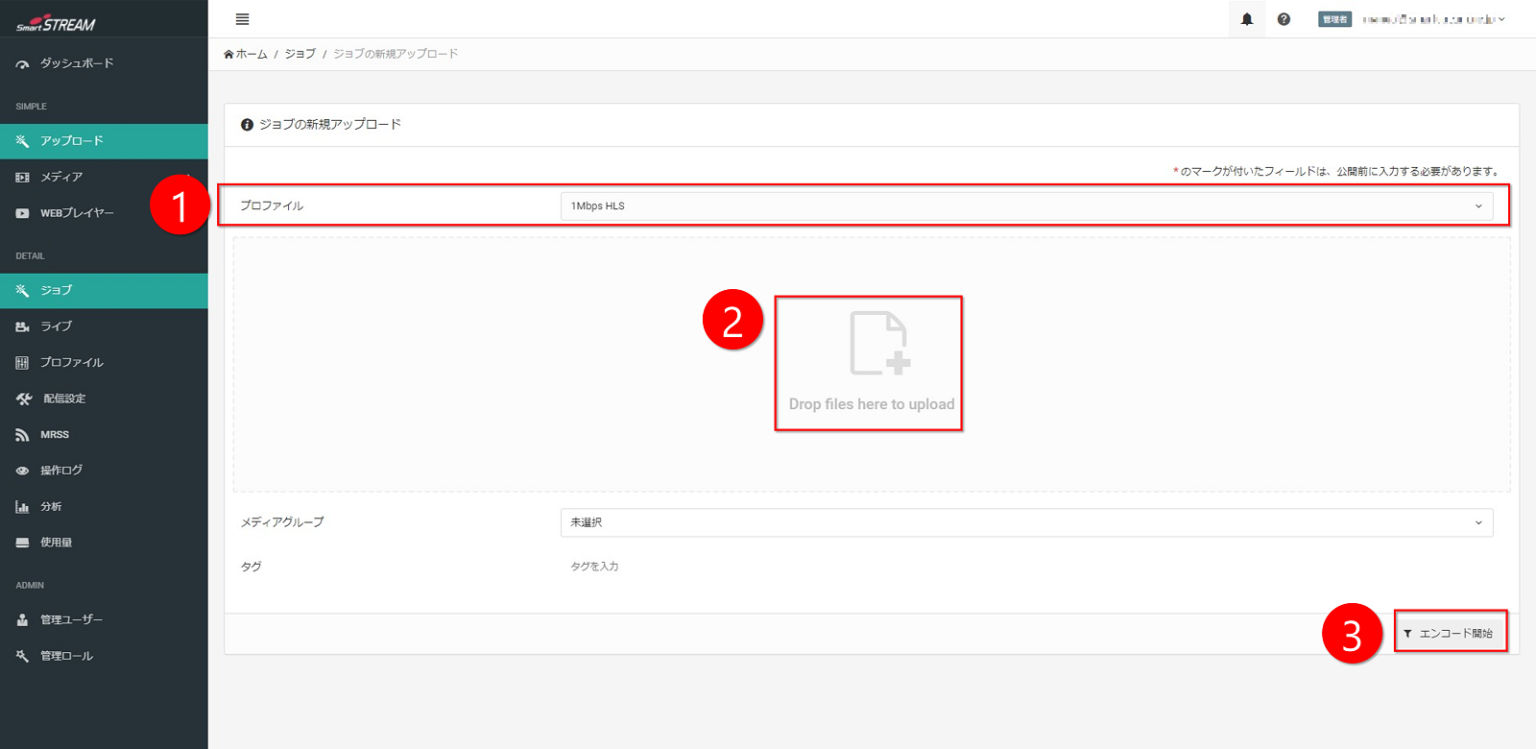
In the profile on the Upload tab, select the format you want to encode.
(For the Simple Plan, this will be 1 Mbps HLS.) -
Drag and drop the content you want to publish on the internet.
-
Click Start Encoding.
-
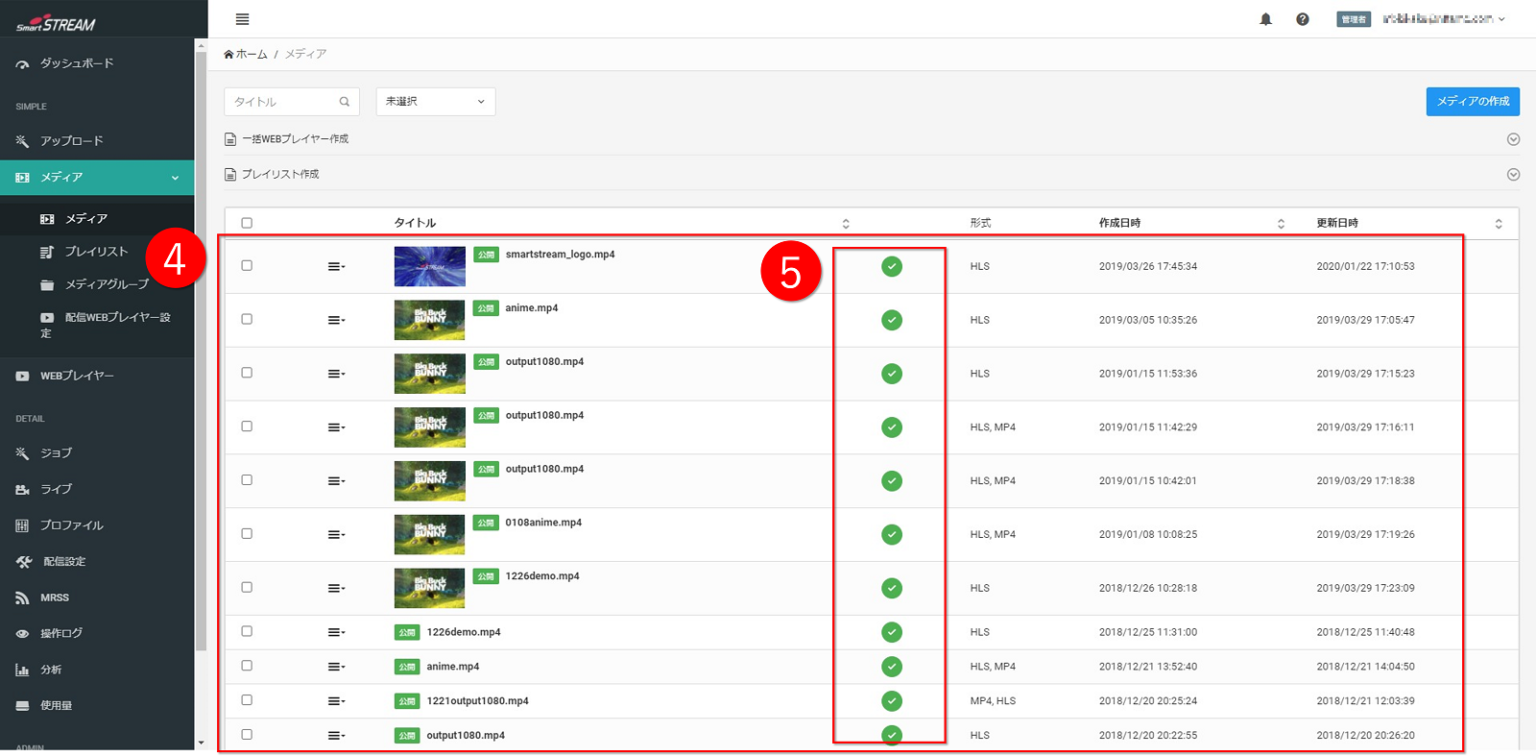
Display the media list from Home > Media tab.
-
When the encoding status of the encoded content shows
 in the media list, the process is complete.
When uploading multiple videos, it is convenient to use the FTP function. When uploading using the FTP function, please refer to "Upload Videos via FTP"
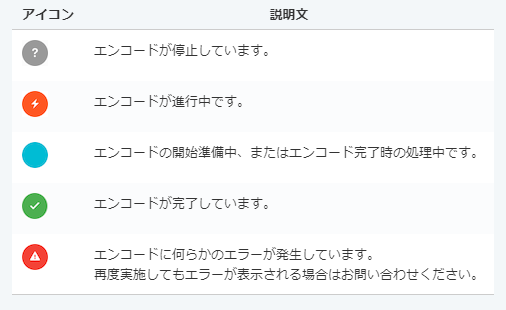
![]() Explanation of Encoding Status Icons
Explanation of Encoding Status Icons
Link Video and Web Player
-
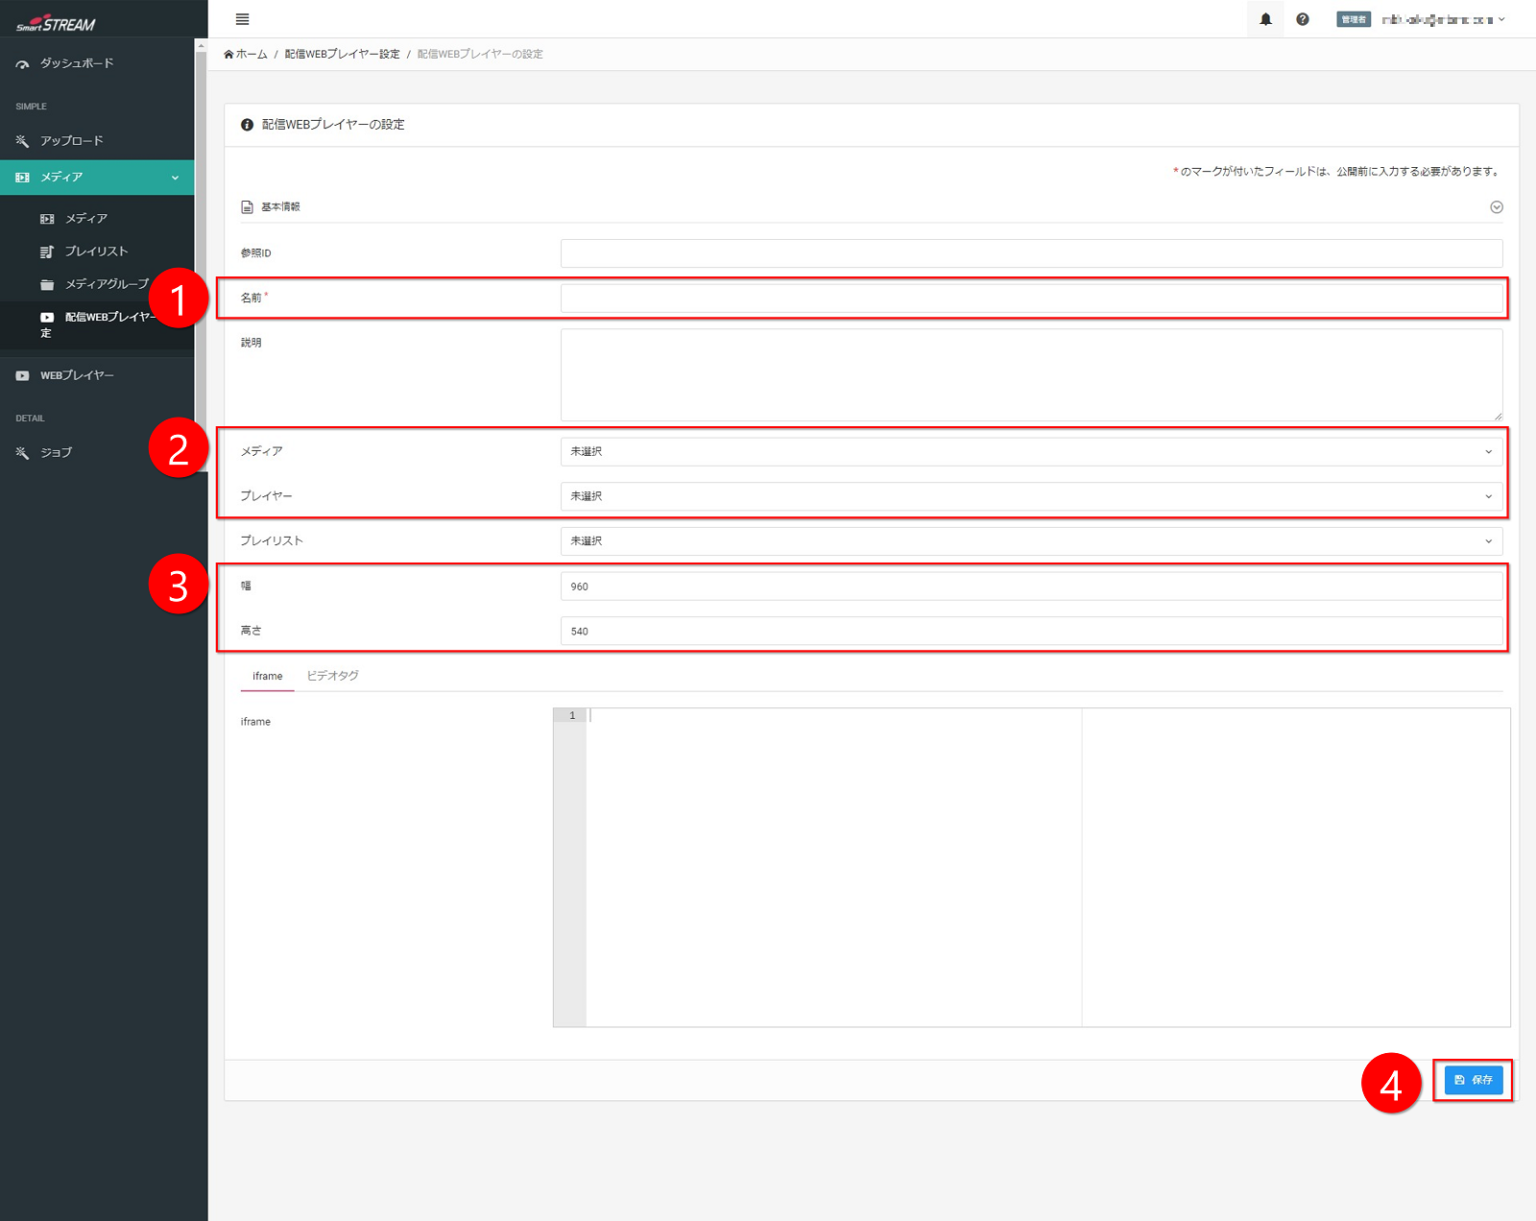
Set a name in Home > Streaming Web Player Settings tab.
-
Select the uploaded media and the created player from the pull-down menus.
-
Set the player size.
-
Click Save.

If no size (width, height) is specified for the video player, Width 1280 Height 720 or Width 640 Height 360 is recommended.
-
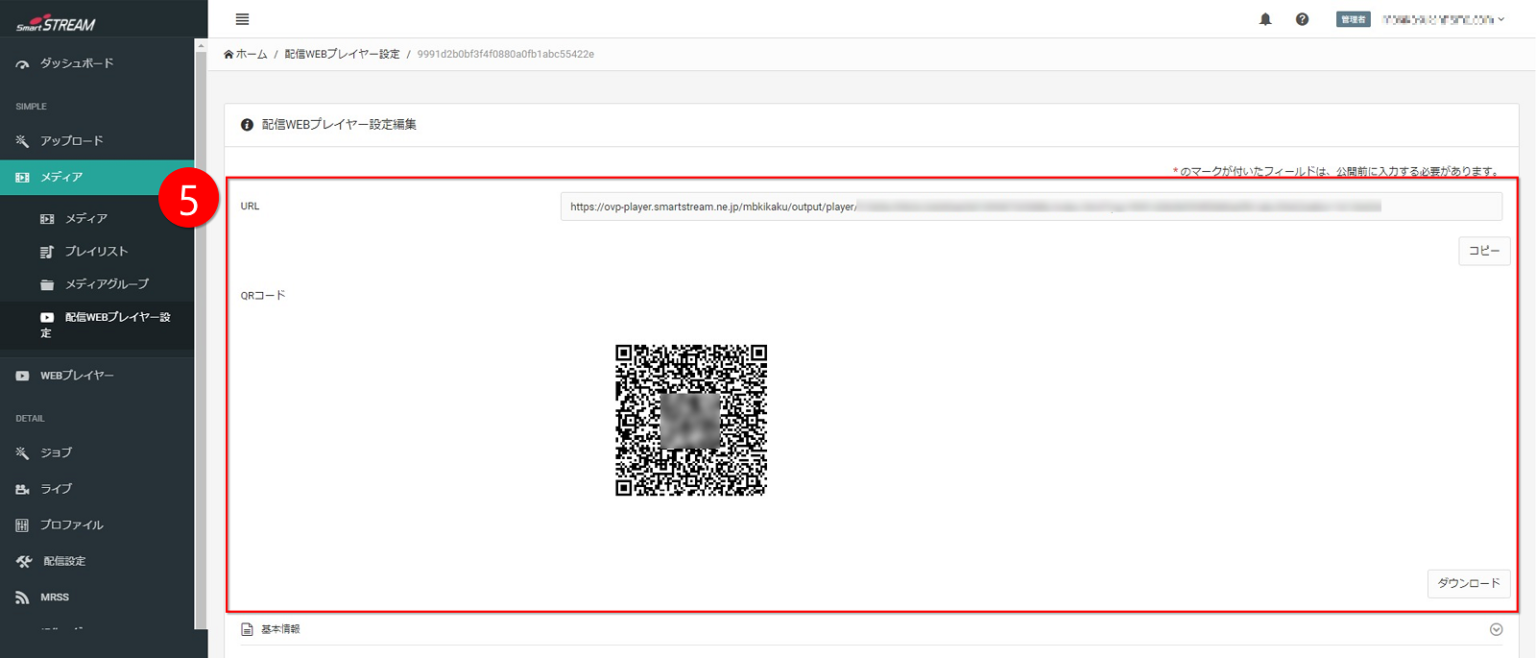
At the top of the screen, a URL for directly viewing the content and a QR code for that URL are generated.
- ・URL: A URL that can be viewed by entering it directly into a browser.
- ・QR Code: Please use this when playing on mobile devices such as smartphones.
-

At the bottom of the screen, HTML tags that can be embedded on your web server are generated.
- ・iframe / video tag: Please use these when embedding the Player into a web page.
* If playback can be confirmed using the URL in step 5, the streaming setup is complete.